What & Why
Deploying many resources as part of a complete solution introduces complexity. Designing a single ARM template to deploy many resources will work, but it comes at the cost of a single large template that is hard for others to understand and make modifications with small amounts of risk.
This is where the use of linked templates becomes useful. A couple benefits include:
- Less risk for modifying smaller templates.
- Reuse of ARM templates.
Let’s imagine that you have a template that deploys 20 resources and the primary person that manages these deployments is out of the office. You have been tasked to change the access policy on a key vault that is being deployed. Would you rather parse through a thousand lines of code to find that key vault access policy and make the change to a single template file, or would you rather find the appropriate template file that only contains information about that key vault and make the necessary changes there? There is far less risk associated with modifying the dedicated key vault template. For example, if you made a syntax error, you are only impacting that resource and all other deployments will be deployed without interruption.
Before You Start
In my guides I use Azure DevOps to deploy. You can sign up for a free account here: Azure DevOps
You will of course need an Azure Subscription as well: Azure Free Account
I use service connections from Azure DevOps to my Azure Subscription. You can learn more about that in my previous post.
Guide
- Create Storage Account & Container
- Create SAS Token
- Create Key Vault
- Add SAS Token to Key Vault
- Create Master ARM Template
- Create Linked ARM Template
- Create Parameters Template
- Create Release Pipeline
- Run Pipeline
Create Storage Account & Container
I am using an existing storage account I created in the previous article. All you need is a storage account with a container. I called my container “deployment”.
Create SAS Token
We will store our linked templates in this storage account. The Azure DevOps agent will need access the templates in this storage account. We will use this SAS token to allow this access.
Create Key Vault
Create a Key Vault for Azure DevOps to retrieve secrets. This is where we are going to store the SAS token that we created in the previous step.
Once created, be sure to add the service principal to the access policy (read/list) that is being used for the Azure DevOps service connection.
Add SAS Token to Key Vault
Now we will add the SAS token to our Key Vault as a secret. Make sure that you include the quotes at the beginning and end of the secret. In the video, this isn’t accomplished. I went back into the portal and added the quotes in the value content area.
Modify Access Policy
Now we must grant Azure DevOps access to retrieve the secret value.
From the Azure Portal, you need to add the service account to the Key Vault with Read and List permissions on secrets. One way to identify this service principal is to navigate to the Azure Portal, open Azure Active Directory, go to App Registrations. From here, find the one with the long GUID on the name. Click on it and check the Application ID URI. It should show something like “VisualStudio” in that field. Copy the Application ID.
Now, head to the Key Vault that you created. Click Access Policies and add a new policy. Select Read and List for secret permissions. Paste the application ID for the account. Click Add and be sure to save on the next screen.
Create Master ARM Template
Create a new template file to be the master template. This file will call other ARM templates and handle the passing of parameters.
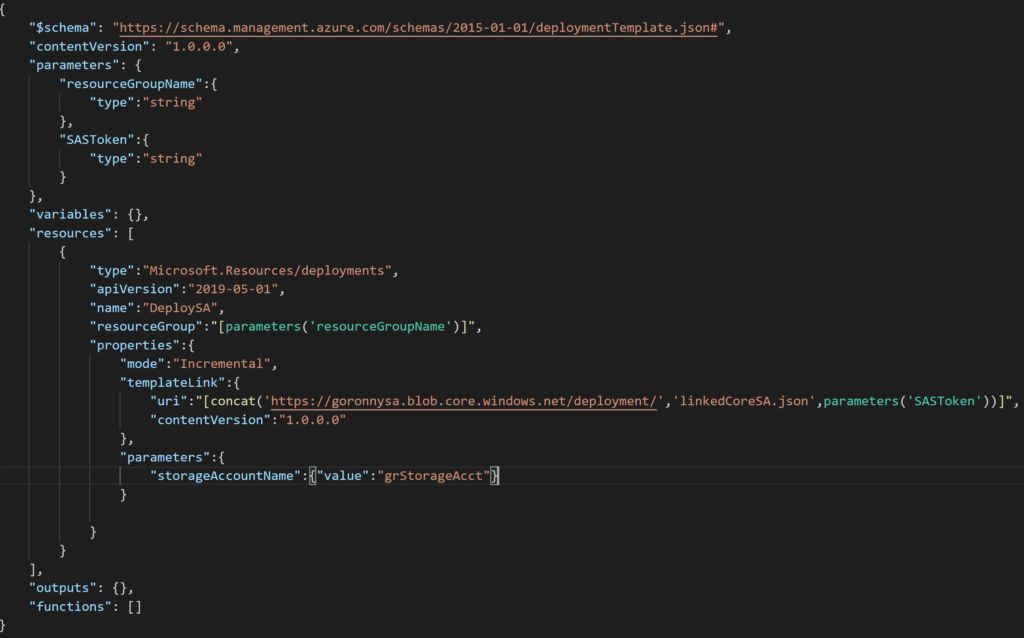
Create Linked ARM Template
Here I am using a template that I had already from my previous post. It’s a very basic storage account. I added a parameter for storageAccountName.
Create ARM Parameter Template
Now you will create the parameter file to pass in parameters to your template. You can also pass in parameters using the release pipeline.
Create the Release Pipeline
Login to Azure DevOps and click Releases. You will now create a new pipeline. I created a new one and now you will see how to add the artifact.
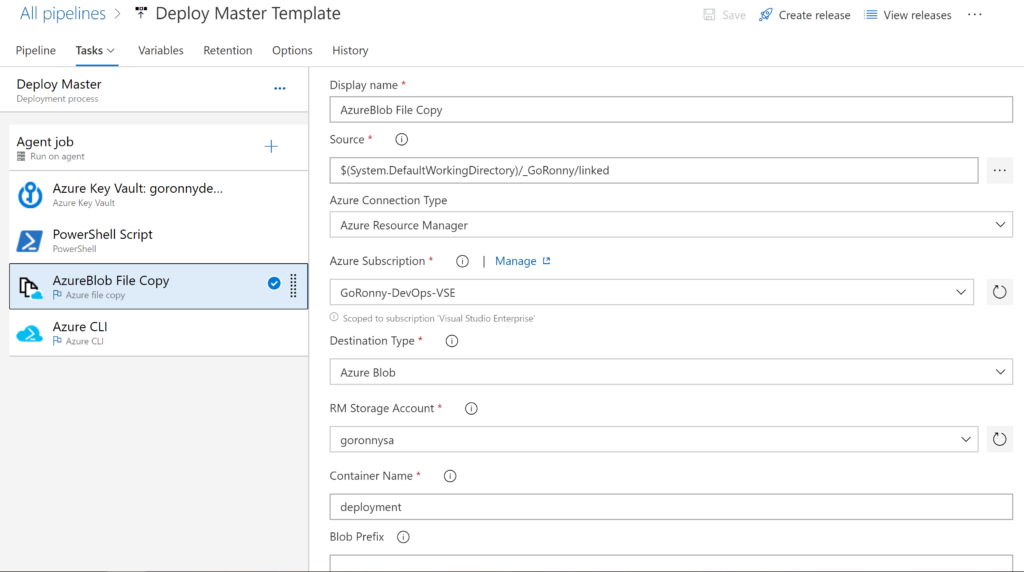
Here we are adding the artifact, which is our repository containing our templates.
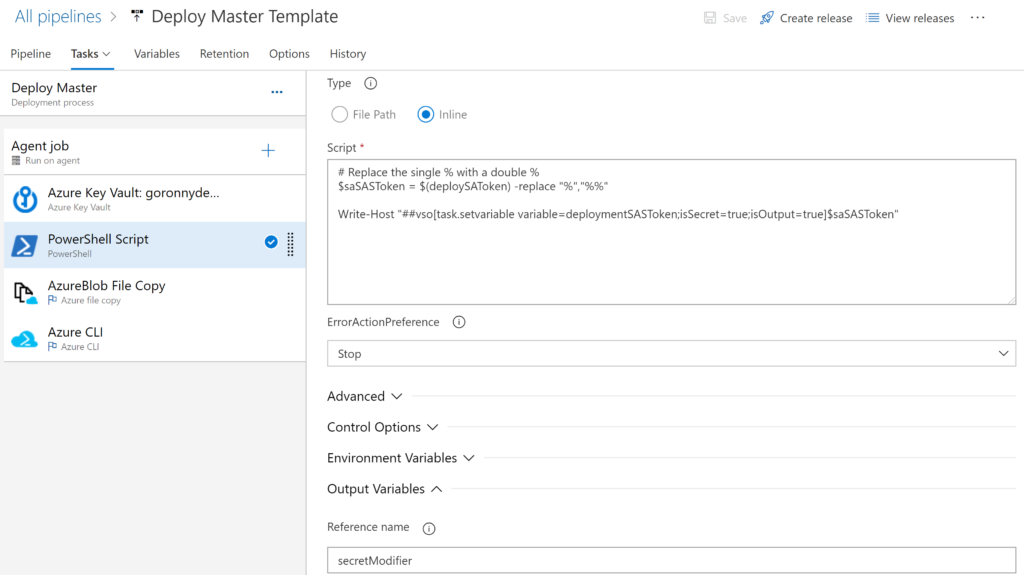
Add our first task, which is a Key Vault task. This will be used to retrieve the secret that we created earlier.
Next I created a PowerShell task to assist with the string that gets returned from the Key Vault. The string contains % characters. These cause problems in future steps so we need to escape them using %%. Here is the PowerShell script that I used for this.
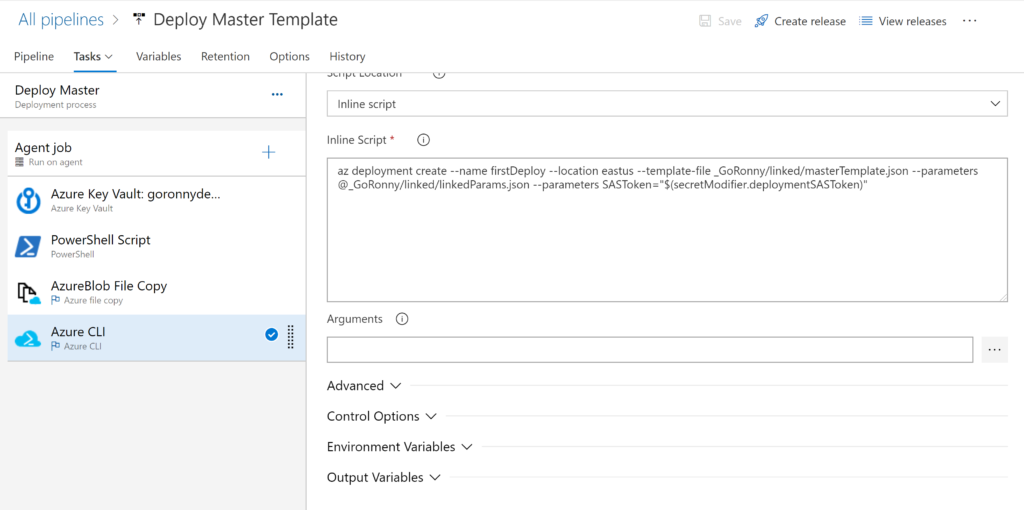
Next you will save and run the pipeline. There are a lot of moving parts to getting this right, so if it fails don’t be discouraged. Use the log output of the agent’s job to troubleshoot.
Conclusion
And that’s it. You should now understand the steps needed to deploy linked templates using Azure DevOps. The string from my secret certainly hung me up for a bit, but after realizing what was happening, it was just a matter of escaping the characters correctly.
The next steps would be to setup an automatic trigger for the source repository and continue to build more linked templates. As you commit your code you can see right away the resources being deployed into Azure. For production, I would recommend that you setup branches for each environment you have, such as a DEV, QUAL, PROD, etc. Maybe my next article will cover going through these steps and deploying to multiple resource groups treating them as environments.